Monday, June 28, 2010

The Hard Master from G.I. JOE Custom Action Figure Art "Ultimate"

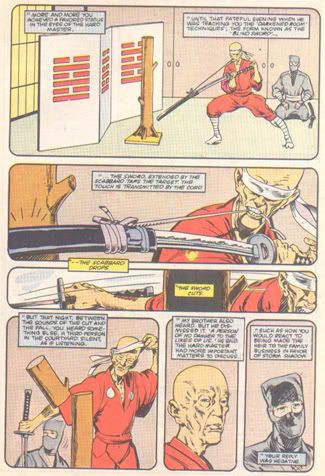
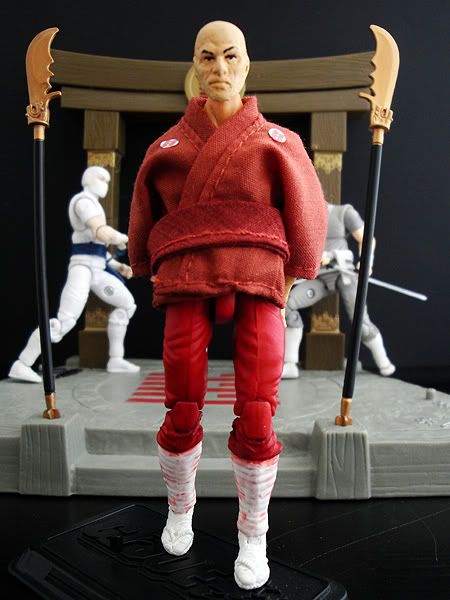
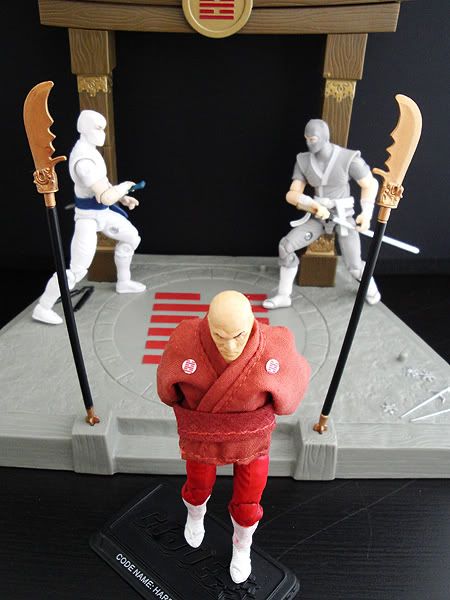
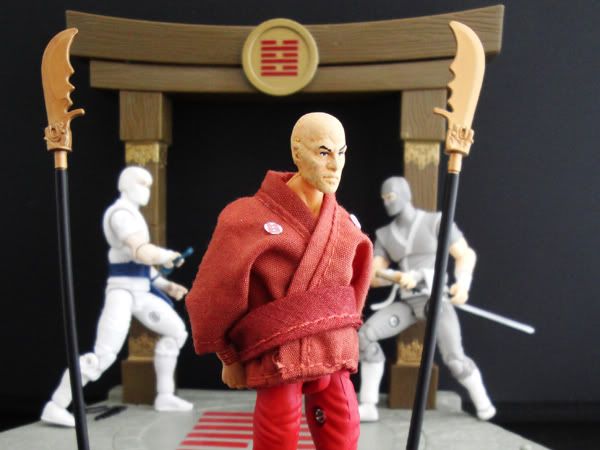
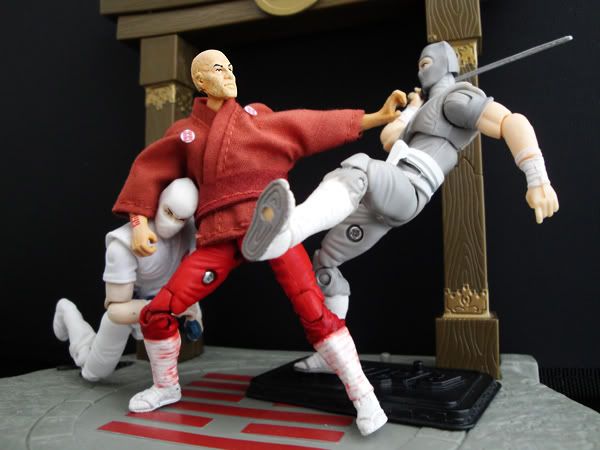
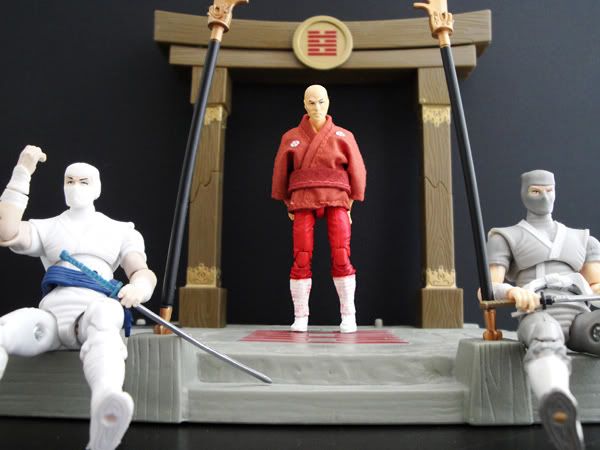
When I posted my first Hard Master custom, I teased that I was working on another one that was even more true to his look from the original Marvel comic books. And just a few months shy of a year later, he is finished and I couldn't be happier with how he turned out.
Photobucket
He's a combination of parts from 8 different figures. Some parts were dyed red to minimize paint rub and wear including the gi top, belt, and legs. I show you how to dye parts here but I must admit, getting the red deep enough and bright enough was a challenge that required multiple and unusually long sessions.
Photobucket
But the one part that gave me the most trouble was the head as I searched far and wide to find a suitable wrinkled, bald, old, Japanese man head. I tried numerous 21st Century WWII figures and Pirates of the Caribbean figures but none of them were a good enough base for me to work with....until I finally bought a Doctor Rex Lewis figure and removed his mask and toupee. I dremeled and sanded the scars smooth in most areas leaving them as wrinkles in others. I also smoothed out some his features to make them appear more Japanese. I painted all the skin, gave it a wash, and then highlighted it to really bring out the details of his face and body. (See the last pic.) Finally, I painted his trademark intense stare.
Photobucket
Photobucket
Photobucket

Photobucket
Photobucket
"Do not let your intensity toward the opponent you see blind you to the opponents yet to reveal themselves."
Photobucket
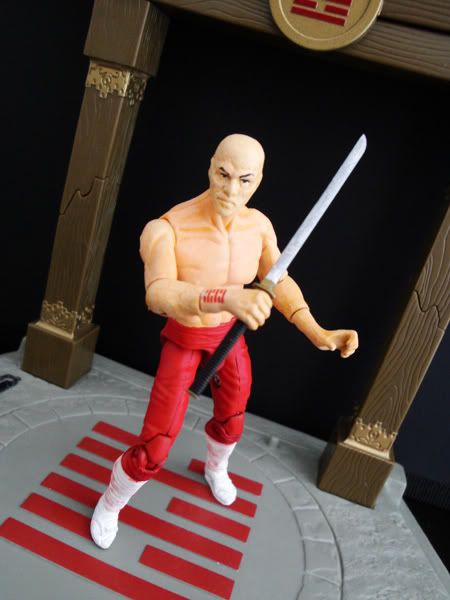
Last but not least, I added the Arashikage tattoo to his right forearm in the correct position using a custom made waterslide decal. I wasn't sure about the "soft goods" gi top at first, but now I can't imagine him without it. Besides, I love the fact that in the heat of battle he can ditch it to show off his sinewy old man muscles. ;-)

I hope you dig him as much as I do. If you're making a Hard Master or other Arashikage of your own, one set of Arashikage tattoo waterslide decals is also still available in my etsy shop. Until next time, I remain "The Insidious One."

Saturday, June 26, 2010

The Little Differences: Zartan and Cobra Commander G.I. JOE Custom Kitbashes

Photobucket
"It's the little differences. I mean, they got the same $#!t over there that we got here, but it's just – it's just there, it's a little different."

*****

This week's "The Little Differences" features two Cobra's; Zartan and Cobra Commander. While both characters have been released numerous times with different decos, accessories, and parts, it took a combination of several of these to make what I feel are their ultimate versions.

While I never owned the vintage Zartan as a kid, I loved to play with my friend's figure and the important part he played in the Marvel comic books only served to deepen my  appreciation for him. However, none of the 25th Anniversary releases were true to the colors of the vintage figure. To remedy this, I used the feet, torso, arms, armor, and thighs from the singled carded release. Combined those with the head, backpack, sniper rifle, pistol, masks, and knife from the Hall of Heroes release and  lower legs of the Cobra Box Set release. These swaps are very simple as they only require a small screwdriver to open the legs. Luckily the colors of the pants match very closely.

I also did a small tweak to his head by adjusting the position of his cowl. It was originally a little too low so you couldn't see his face very well. I dropped the head in some boiling water to soften the glue that attaches the cowl to the head and after about a minute, it pealed right off. I put a tiny dab of crazy glue in the ridge of the head, positioned the cowl the way I liked it, and held it in place for a minute to let the glue set.

Now he's back in black and ready to assassinate the Had Master!

Photobucket

The Cobra Commander has a fantastically unique uniform but every release of him seemed to get one or two details wrong. The Senior Ranking Officers Commander was pretty darn close with lots of great painted details like the buckle triangle, rank pins, and jacket buttons so I used him as a base and then added the chrome head from the DVD Battles pack version. But still one thing was missing...the red stripe down his right pant leg. I used a thin red waterslide decal to create the stripe, but if you have a steady hand or masking tape, you could use paint to achieve the same effect.

Photobucket

After last week's more involved bashes, these two are pretty simple once you gather the necessary parts. I hope you dig 'em and see once again that the little differences can make a big impact on your figures.

P.S. - Be sure to check out JACKOFTRADZE contribution to "The Little Differences" on his blog. jackoftradze.blogspot.com He tells you how to upgrade two Star Wars vehicle staples, the Y-Wing and the A-Wing!

Friday, June 18, 2010

The Little Differences: Rip Cord and Grand Slam G.I. JOE Custom Kitbashes

Photobucket

It's the little differences. I mean, they got the same $#!t over there that we got here, but it's just – it's just there it's a little different.

*****
This week's little differences features a more involved bash and a very simple bash. I hope you dig them.

We finally got a 25th Anniversary style Rip Cord G.I. JOE action figure in the guise of Spc. Altitude in the Assault on Cobra Island internet exclusive figure set. But he was a bit of a let down in a lot of ways. 1) He had the ugly Red Star head. 2) He didn't have an oxygen tank. 3) He had no altimeter.

The first thing I did was fix that head so I changed it to the Ace head from the Toys R Us Exclusive Air Command 3 pack. The Ace head more closely resembles his face from the Marvel comics and the hair color is almost perfect so no painting needed. However, the Ace head is also a little smaller than the Red Star head, so you'll need to add a tiny dab of hot glue to the back of the helmet so it fits snugly.

Photobucket

Next I popped his left hand and added the wrist communicator from Tomax to give him an altimeter.

Photobucket

Then, (and now this is the part I warned you about in last week's post) I took the air tank from a ROC Cobra Eel, trimmed the hose off up to the valve, drilled a small hole with the dremmel in the front parachute, put a tiny dab of glue in the hole, and inserted the peg of the air tank. I was planning to connect the hose from his mask to the valve on the air tank but for the sake of pose-ability of the head, I did not.

Photobucket

And for the icing on this cake, I created and added a tiny waterslide decal of the patch that was pictured on his original 1984 card art. (You too can add this patch to your Rip Cord as it is available for a limited time at my Etsy shop.)

This week's second figure is something many have done but I added one thing that puts him over the top. Grand Slam came with the Target Exclusive Night Specter and was almost perfect in my opinion except for one glaring omission, his jet pack. To get a jet pack that most closely resembled the original green, I used the one from the Target Exclusive Ultimate Battle Pack Stalker.

Photobucket

I also had an extra "jet flames" from a Star Wars Boba Fett figure from a few years ago and it fits perfectly into the exhaust holes of the jet pack.

But the bit that really puts this one over the top is the waterslide decal I designed and added to the jet pack. On the original JUMP Jet Pack there was a sticker on the back of the pack and for some reason Hasbro hasn't included it with any of it's releases.

Photobucket

If you would like to add the decal to your jet pack, it is available for a limited time in my Etsy shop. Get it before it disappears.

Are you daring enough to go above and beyond a normal "Little Differences" to make these two? I think they're worth it. Until next time...

Friday, June 11, 2010

The Little Differences: Short Fuze, Grunt, and Jan Ors by JACKOFTRADZE

Photobucket
Vincent: It's the little differences. I mean, they got the same $#!t over there that we got here, but it's just – it's just there it's a little different.

*****

A
s two of the "Original 13" Joes, Short Fuze and Grunt have a special place in my heart. So when we finally got 25th Anniversary versions, of them, my original team was (nearly) complete. Short Fuze came with the Target Exclusive "Ultimate Battle Pack" and was almost perfect ...except for the lack of a clear visor on the helmet and the head which was a Doc repaint and sat too high on the neck post. While the Doc head is great for Doc, it doesn't quite fit the intense expression I remember in Short Fuze's 1982 original package art.

The head is from the Hawk comic pack which not only had the perfect intense expression, but the blond hair as well. (Then what about Hawk you ask? I'll get to that in another post.) I also took the visor from that comic pack hawk and I used a tiny drill bit in my dremmel to put two holes in the sides of the helmet so the visor would snap into place. To complete the look I gave him a mortar shell from a BBi weapons pack that was on clearance at TRU.

Photobucket

Grunt was released with one of the Toys R Us exclusive Senior Ranking Officers Sets but his unform was a goofy green color that didn't look good with the other more drably dressed Joes. While the original 13 had varying green colors, none had this bright of a green color. So I took the head and gear from the figure and put it on a comic pack Duke body. I still think I need to dremel the head a little bit so it sits a little lower on the neck post but Grunt now fits in with his buddies. (Thanks to JACKOFTRADZE for this one.)

Photobucket

And speaking of JACKOFTRADZE, you can check out more pics and info on his contribution to this week's The Little Differences "Jan Ors" at his blog. He offers up the recipe as well some witty insights into Star Wars comic packs and collecting. Check out the teaser below!

Photobucket

Once again, you can see that with a little parts swapping (and maybe a little drilling this time) you too can make your figures much better. Stay tuned as next week's figures take a little more effort than usual but are also that much cooler...

Friday, June 4, 2010

The Little Differences: Lando Calrissian Guest Starring JACKOFTRADZE

Photobucket
Vincent: It's the little differences. I mean, they got the same $#!t over there that we got here, but it's just – it's just there it's a little different.

*****

I actually got the idea for "The Little Differences" from the conversations I have with fellow toy designer, customizer, and good friend JACKOFTRADZE. Recently, he started his own blog so without further ado I give you his first installment in this series; everyone's favorite Cloud City Administrator Lando Calrissian. See the teaser pics below and click here to learn how you too can make the perfect Lando with very little effort!

Photobucket

Photobucket

You can check out the rest of his cool customs at http://jackoftradze.blogspot.com/.