Vincent: It's the little differences. I mean, they got the same $#!t over there that we got here, but it's just – it's just there, it's a little different.
*****
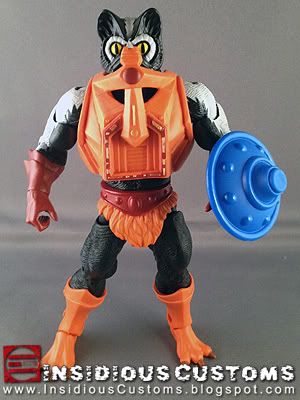
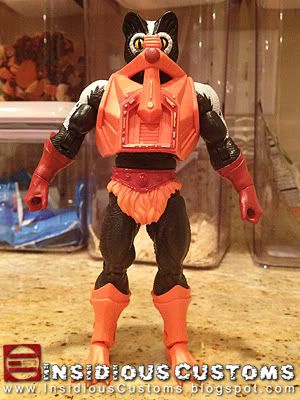
I was really looking forward to Stinkor in Masters of the Universe Classics. He is based on a
goofy vintage character whose "power" was bad odor and whose figure was made from parts of other figures. Knowing firsthand how fast the toy industry moves, I applaud the designer's creativity. I can only imagine the boss coming to the designers saying, "We need six brand new, totally unique characters by next week and we don't have any money for tooling so use existing parts!" They turned what could have been a lemon into a stinky smelling glass of lemonade.
However, when
sample photos and
Pixel Dan's video review of the new MOTUC version surfaced, it was clear that the figure's right and left forearms had been swapped. Fans assumed this was yet another manufacturing error. However, Scott "Toy Guru" Neitlich, Brand Manager for MOTUC said it was a purposeful change to make the figure stand-out from other figures that shared similar forearms. Either way, the forearms look terrible this way and they're anatomically wrong.
What's a fan to do? Live with it? No, way! A simple part swap and a little paint will do the trick. Don't be frightened. I know you can do it. I'll even show you how, step-by-step, and tell you what supplies you'll need. As you can see below, the end result is well worth it.
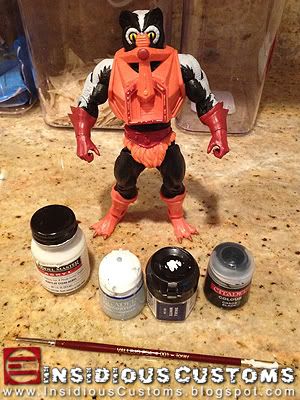
 What you'll need...
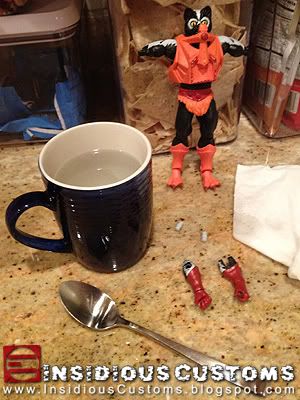
1) Hair dryer
AND/OR large coffee cup, tap water, small spoon, and microwave
2) Paint
• Games Workshop Light Gray
• Games Workshop White
• Games Workshop Black
• Testors Matte Acryl
3) #001 Brush
4) #4 Brush
5) Plastic lid or Clear Package Blister From an Action Figure (Something small and neutral colored to mix your paint on.)
6) (OPTIONAL) Non-acetone nail-polish remover and cotton swabs
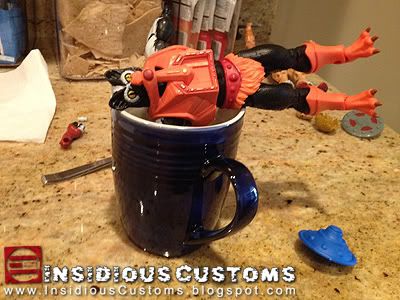
Step 1: Remove Those Funky Forearms
Hot Water Method: Warm-up a cup of water in the microwave for 3 minutes. Submerge one arm in the water for about 30 seconds. Using your fingers, pry the sides of the elbow joint off of the little peg that holds it in place. Do them one at a time and then slide the peg out from the center of the joint.
Hair Dyer Method: Set the hairdryer to hot and warm-up the elbow. Keep the hairdyer moving back and forth over the elbow. Slowly warm it up or you may damage or permanently deform the plastic. Pry the sides of the elbow off the peg. Do them one at a time and then slide the peg out from the center of the joint.
 Step 2: Swap The Hands
You could do this as part of step one but if you didn't, warm-up the wrists as described above and gently pull them out. Do not pull them straight out, work them out slowly bending the hand to ensure that the peg holding the hand in place does not break or tear.
Step 3: (OPTIONAL) Remove The White Paint
This step is purely optional but I did it because I wanted to minimize paint rub inside the joint which was painted white. To do this, take the non-acetone nail-polish remover and fill the cap halfway. Then take one of the cotton swabs and dip just the tip in the nail-polish remover. Rub the tip of the cotton swab onto the white paint. As you rub, the white paint will adhere to the swab and so you will have to change it frequently. If you don't you will simply spread the white paint back onto the piece. Be careful not to get the nail-polish remover on any other paint as it will ruin it. Be sure to thoroughly rinse the part in cold water after you have removed the paint as any residual nail-polish remover can damage the plastic. (If you're more experienced, you can use acetone based nail-polish remover. It's much stronger and removes the paint without as much elbow grease which means you have to be twice as careful with it.)
 Step 4: Paint It Black
If you skipped step 3 or you weren't able to get all of the white paint off, paint the inside of the forearms black using the #4 brush. Pay particular attention to the area where the black meets the gloves. There is a natural ridge created by the gloves that will help you stay off of the red paint.
Step 5: Assemble Him Like His Momma Intended
Slide the peg back into the elbow joint, then, using the hair dryer method as described in Step 1, warm up the forearm. Pull back the sides of the joint and then pinch them around the peg. If you have trouble getting them to fit on the peg, wrap the joint in a towel, and apply pressure with a pliers. (The towel will prevent the pliers from digging into and damaging the plastic.)
 "Get a load of THESE pits, baby! They don't call me Stinkor for nuthin'."
 Step 6: The Empire Stripes Back!
This is the step most people fear. But it's honestly the easiest. If you've made it this far, painting the stripe on his forearms is just icing on the cake. The fact that it's an irregular organic shape, it is very forgiving and does not need to be exact. The stripe is also not 100% pure white which is why you will need to use the #4 brush to mix
one-part grey and
two-parts white paint on your plastic lid or blister. If the color isn't right, add grey or white until you're close enough to the color of his stripe.
Then, using the #001 brush, trace an outline on the forearms following the pattern on the upper arms. If each jagged shape is a "tooth," the forearms should only fit one "tooth" on each side. See the close-up photos of my forearms below for reference.
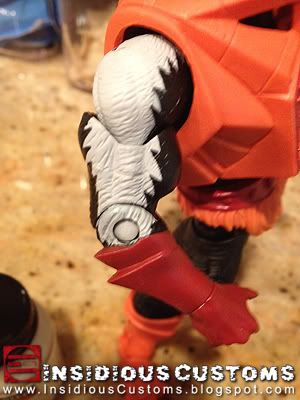
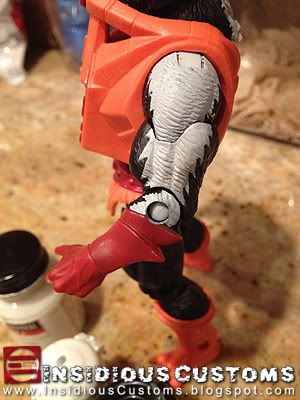
After you've created your outline, fill it in with your brush staying in the lines you created. For that extra touch to match the original deco, be sure to paint the inside edge of the joint too. When your paint is dry, put a light coat of Testor's Matte Acryl over your paint. It will help prevent wear, fading, and chipping. But be careful not to use too much as it will pool and leave a white residue.
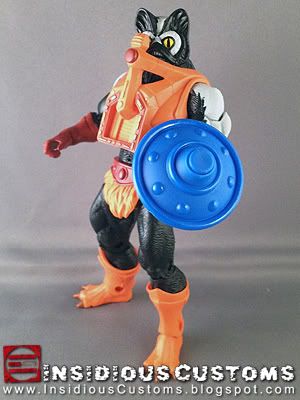
Now Stinkor is anatomically correct and ready to stink up your collection! You may have noticed my Stinkor's shield looks a little different as well. I painted the inner and outer rings as well as the shield rivets with a clear gloss varnish to make the details "pop" as some say. ;-)
I hope this tutorial helps you. If it did...or didn't, leave a comment below. Nobody should have to live with an anatomically incorrect Stinkor and I hope you see once again how the little difference can make a big difference in your collection. Until next time, I remain
The Insidious One.