

"It's the little differences. I mean, they got the same $#!t over there that we got here, but it's just – it's just there, it's a little different."
*****
This week's "The Little Differences" features two Cobra's; Zartan and Cobra Commander. While both characters have been released numerous times with different decos, accessories, and parts, it took a combination of several of these to make what I feel are their ultimate versions.
While I never owned the vintage Zartan as a kid, I loved to play with my friend's figure and the important part he played in the Marvel comic books only served to deepen my appreciation for him. However, none of the 25th Anniversary releases were true to the colors of the vintage figure. To remedy this, I used the feet, torso, arms, armor, and thighs from the singled carded release. Combined those with the head, backpack, sniper rifle, pistol, masks, and knife from the Hall of Heroes release and lower legs of the Cobra Box Set release. These swaps are very simple as they only require a small screwdriver to open the legs. Luckily the colors of the pants match very closely.
I also did a small tweak to his head by adjusting the position of his cowl. It was originally a little too low so you couldn't see his face very well. I dropped the head in some boiling water to soften the glue that attaches the cowl to the head and after about a minute, it pealed right off. I put a tiny dab of crazy glue in the ridge of the head, positioned the cowl the way I liked it, and held it in place for a minute to let the glue set.
Now he's back in black and ready to assassinate the Had Master!

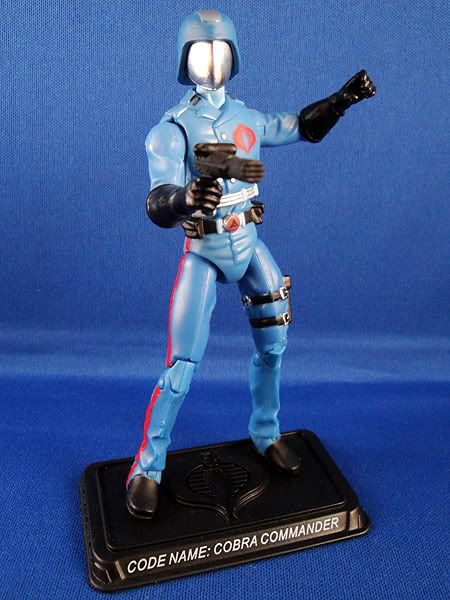
The Cobra Commander has a fantastically unique uniform but every release of him seemed to get one or two details wrong. The Senior Ranking Officers Commander was pretty darn close with lots of great painted details like the buckle triangle, rank pins, and jacket buttons so I used him as a base and then added the chrome head from the DVD Battles pack version. But still one thing was missing...the red stripe down his right pant leg. I used a thin red waterslide decal to create the stripe, but if you have a steady hand or masking tape, you could use paint to achieve the same effect.
After last week's more involved bashes, these two are pretty simple once you gather the necessary parts. I hope you dig 'em and see once again that the little differences can make a big impact on your figures.
P.S. - Be sure to check out JACKOFTRADZE contribution to "The Little Differences" on his blog. jackoftradze.blogspot.com He tells you how to upgrade two Star Wars vehicle staples, the Y-Wing and the A-Wing!
*****
This week's "The Little Differences" features two Cobra's; Zartan and Cobra Commander. While both characters have been released numerous times with different decos, accessories, and parts, it took a combination of several of these to make what I feel are their ultimate versions.
While I never owned the vintage Zartan as a kid, I loved to play with my friend's figure and the important part he played in the Marvel comic books only served to deepen my appreciation for him. However, none of the 25th Anniversary releases were true to the colors of the vintage figure. To remedy this, I used the feet, torso, arms, armor, and thighs from the singled carded release. Combined those with the head, backpack, sniper rifle, pistol, masks, and knife from the Hall of Heroes release and lower legs of the Cobra Box Set release. These swaps are very simple as they only require a small screwdriver to open the legs. Luckily the colors of the pants match very closely.
I also did a small tweak to his head by adjusting the position of his cowl. It was originally a little too low so you couldn't see his face very well. I dropped the head in some boiling water to soften the glue that attaches the cowl to the head and after about a minute, it pealed right off. I put a tiny dab of crazy glue in the ridge of the head, positioned the cowl the way I liked it, and held it in place for a minute to let the glue set.
Now he's back in black and ready to assassinate the Had Master!

The Cobra Commander has a fantastically unique uniform but every release of him seemed to get one or two details wrong. The Senior Ranking Officers Commander was pretty darn close with lots of great painted details like the buckle triangle, rank pins, and jacket buttons so I used him as a base and then added the chrome head from the DVD Battles pack version. But still one thing was missing...the red stripe down his right pant leg. I used a thin red waterslide decal to create the stripe, but if you have a steady hand or masking tape, you could use paint to achieve the same effect.

After last week's more involved bashes, these two are pretty simple once you gather the necessary parts. I hope you dig 'em and see once again that the little differences can make a big impact on your figures.
P.S. - Be sure to check out JACKOFTRADZE contribution to "The Little Differences" on his blog. jackoftradze.blogspot.com He tells you how to upgrade two Star Wars vehicle staples, the Y-Wing and the A-Wing!


No comments:
Post a Comment
Like what you see? Share your thoughts!